


Five Easy Festive Nail Looks to try this Christmas
Christmas is a time of year when people love to treat themselves and feel a bit more special than usual. Over the years, there’s been a huge rise in the trend of festive nail art, which can range from super sparkly to full on festive scenes. Mavala’s in-house nail expert Lynn Gray has outlined five fantastic festive looks that are easy to achieve using Mavala products from home, so if you’re unable to go to a salon this year, you can create these looks yourself.
Lynn starts off by saying “always use a base coat before painting your nails as it will protect the nails and prevent discolouration”
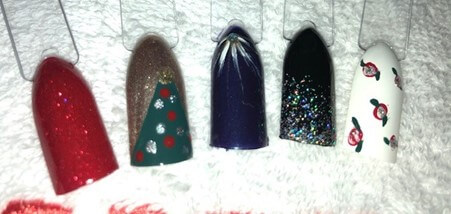
Look 1 – Classic Red Dorothy Shoes
A very simple nail look with maximum festive impact.
- Paint your nails with a classic red shade such as ‘Moscow’
- Next, find a glitter red polish like ‘Red Diamond’ and paint over one accent nail, or all of your nails for the perfect Wizard of Oz, ‘Dorothy Shoes’ style Christmas mani.
Look 2 – Christmas Tree
For those who feel a little braver and want a really eye catching look.
- Paint your nails in ‘Cyber Gold’ polish and wait to dry.
- Next paint on a triangle shape across the hole of the nail in a green polish such as ‘Copenhagen’ for your Christmas tree shape. You can use tape either side if you’re worried about straight lines.
- Next choose a selection of festive polishes and using a dotting tool or cuticle stick to place dots of colour onto your green triangle to decorate your Christmas tree.
- Finish off with another big dot of ‘Cyber Gold’ at the top of your triangle for a sparkly star at the top.
Look 3 – Shooting Star
Recreate a festive night sky with this shooting star look.
- Start by painting your nails in ‘Deep Blue’ night sky colour.
- Next choose a solid ‘White’ nail colour and dab a blob onto some card.
- Using a fine brush, dab some of the polish at the corner of your nail and flick out from the centre to create a feathered effect.
- Using some nail polish remover, clean off your brush ready for the next colour.
- Using the same technique as above, use ‘Cyber Gold’ in between the white flicks to create more flicks and create a star shape.
- Lastly, dab a glitter polish like ‘Pure Diamond’ in the middle of your star to give the effect of a rhinestone.
Look 4 – Glitter gradient
Perfect for those who want a festive twist on a French mani.
- Start with a jet ‘Black’ polish and allow to dry ahead of the glitter.
- Next, use a glitter polish like ‘Pure Diamond’ and dab at the tip of the nail.
- Wipe off any excess polish from the brush and drag the glitter from the tip of the nail down to mid-way across the nail, and keep doing so until you’re happy with the gradient.
Look 5 – Roses
The final look is one for those brave to try something more intricate.
- Using a white polish, paint all of your nails and leave to dry.
- Next using a dotting tool or cuticle stick, dot red polish across the nail with plenty of space between them.
- Now use a green polish like ‘Copenhagen’ and using a nail art brush, paint tiny leaves either side of the red dots.
- Next use a hint of white and swirl the middle of the red dots you made originally to add texture to the rose. This does not have to be neat as no roses are the same and it adds texture to the flower.
- Finish with a little dab of ‘Red Diamond’ in the middle to give your rose a glittery finished.
“Each nail look is best finished off with the Mavala Gel Finish Top Coat, to give long lasting shine and protection. These looks can be done across all nails or you could even try all 5 on one hand! For those looking for a one colour look, we love ‘Limelight’ as it has a duo chrome effect flashing from gold to pink.”
Let us know if you’ll be trying out any of these looks, and make sure to tag us on Instagram @mavalauk


